I recorded GPS log almost everyday over 2 years from 2005 to 2007. The total size of the log is about 1GB in more than 1,000 NMEA files. There are several millions of track points.
These numbers have been challenging for browsing all log at once on a map.
But thanks to great improvements in computer hardware and software since then, I manage to do it on common desktop PC and open source software. Watch the video to see how smoothly it moves keeping all the details of tracks.
In this article, I will describe how to make it.
Environment
In terms of hardware, PC specifications are:
| CPU | Core i5-6600 @3.30GHz |
|---|---|
| RAM | 32.0GB |
| GPU | AMD Radeon R7 200 series |
For software, I use:
| OS | Windows10 |
|---|---|
| Viewer | QGIS 2.18.22 |
| Data source | SpatiaLite 4.3.0 |
All of these specifications are not special, though may not be low-end, I guess.
Introduction of Data preparation
Data preparation consists from:
- Make cleansed GPX files.
- Import GPX files into SpatiaLite file.
The first step can be done with any tool. I used GPSBabel and GPS Track Editor, which has very convenient "Filter Local Inconsistency" function. I also wrote small python scripts to merge GPX files and to sort tracks.
The second step is done with gpx2spatialite. It is a Python script, but it requires some efforts to run. I will describe details. Following steps are confirmed on clean install of Xubuntu 16.04 (light-weight variant of Ubuntu) on VirtualBox. Since I only use command lines, any variant of Ubuntu 16.04 will work as same.
UPDATE (2020-06-26): Facing retirement of Python2, I wrote Xubuntu20.04 version of the installation process.
SpatiaLite installation
First, you have to install SpatiaLite. Note that there are two formats of SpatiaLite binary: "shared library" and "dynamic link library" (loadable module), and you need the latter. The technical background can be found here. https://www.gaia-gis.it/fossil/libspatialite/wiki?name=mod_spatialite
$ sudo apt install libsqlite3-mod-spatialite
You need SQLite3 command line to test the install.
$ sudo apt install sqlite3
Then, you can do like below and confirm that it's correctly installed.
$ sqlite3 test.db
sqlite> select load_extension("mod_spatialite");
sqlite> select spatialite_version();
4.3.0a
gpx2spatialite execution
gpx2spatialite is a python script designed for Python2 which is retiring version. So you have to make sure that dependent packages are installed for Python2, not for Python3.
$ sudo apt install python-pip

$ pip2 --version
pip 8.1.1 from /usr/lib/python2.7/dist-packages (python 2.7)
Though gpx2spatialite itself is also designed to be installed with pip, I prefer running it locally in home directory because I would like to modify it. To run package locally, you can use "develop mode" of setuptools. Dependent Python library (gpxpy) is automatically installed with setup.py.
$ sudo apt install git
$ git clone https://github.com/ptrv/gpx2spatialite.git
$ cd gpx2spatialite
$ sudo python2 setup.py develop
$ cd ~
$ gpx2spatialite create_db mygpstrack.db
See the tables prepared in the file.
$ sqlite3 mygpstrack.db
sqlite> .tables
ElementaryGeometries                idx_waypoints_geom_parent
SpatialIndex                        idx_waypoints_geom_rowid
citydefs                            spatial_ref_sys
files                               spatial_ref_sys_all
geom_cols_ref_sys                   spatial_ref_sys_aux
geometry_columns                    spatialite_history
geometry_columns_auth               sql_statements_log
geometry_columns_field_infos        tracklines
geometry_columns_statistics         trackpoints
geometry_columns_time               tracksegments
...
Finally you can import GPX files into the database. In the example below, I assume "gpx-samples" directory contains GPX files. It may take some minutes depending on GPX size.
$ gpx2spatialite import -s -d mygpstrack.db -u user gpx-samples/
Found 31 .gpx files.

Do you want to add user as a new user? y or n y
User user sucessfully added to database
################################################
Parsing points in gpx-samples/2005-12-25-104714.gpx
File first timestamp: 2005-12-25 15:47:50, last timestamp: 2005-12-25 16:07:43

Parsing 1166 points and 0 waypoints from gpx file took 0:00:00.114272
Entering into database took 0:00:00.193513
################################################
...
See the imported data.
$ sqlite3 mygpstrack.db
sqlite> select * from tracklines limit 10;
...
sqlite> select count(*) from tracklines;
...
To further inspect the database, you would prefer spatialite-gui command, which has GUI as its name states.
$ sudo apt install spatialite-gui
gpx2spatialite has regular "--help" option to show command options.
$ gpx2spatialite --help
...
To see subcommand options, do like below.
$ gpx2spatialite import --help
...
Displaying in QGIS
I use QGIS not in virtual machine but on bare metal Windows PC just for better graphical performance, though I have not done any serious benchmark. QGIS version I use is 2.18.22, but 2.18 or newer will be fine for its good support of WMS.
Downloading and installing QGIS are pretty straight forward. I don't think any explanation is needed.
After installing, start QGIS Desktop. Then, follow the steps below.
- Add a WMS layer, set WMS URL to https://osmlab.github.io/wmts-osm/WMTSCapabilities.xml, and pick "mapnik" layer. (Layer -> Add Layer ...)
- Ensure "Project CRS" is set to EPSG:3857, which is so called Web Mercator, and enable "on the fly" CRS transformation. (Project -> Project Properties ...)
- Change layer style to grayscale. (right click "OpenStreetMap" in the Layers panel, choose "Properties", and in "Style" tab, set "Grayscale" to "By lightness".)
- Add a SpatiaLite layer with connection to just created mygpstrack.db and select "tracklines" table.
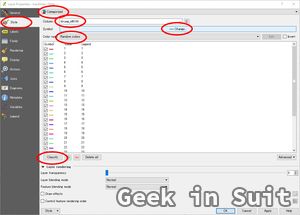
- Change layer style to "Categorized" with "Random colors" based on "Column" "trkseg_id%100". I also increase line width to 1.0. Click "Classify" button to assign random colors. See the image on right.
- Set "Rendering behavior" to use multiple CPU cores. (Settings -> Options, find a check box in "Rendering" tab.)
Now you can pan and zoom around as in the first movie.
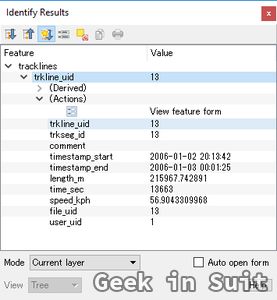
When you want to know details of a particular track, click "Identity Features" button and then click that track. You will see properties like timestamp of the track like the image on right.
Although you may need to modify GPX and import it several times to be satisfied, further steps will be just matters of SQL (SpatiaLite) and GIS (QGIS). Both are not special and tons of information are available online and offline.

